Last updated: September 18, 2026
Coffee oils are part of what makes a fresh grind smell rich, but they also cling to burrs, chutes, hoppers, and grinding chambers. Over time, that sticky residue traps old grounds and can make new coffee taste bitter, stale, or rancid. It may also slow the grinder, create clumps, or cause inconsistent dosing.
Learning how to remove coffee oils from grinder surfaces is mostly a matter of using the right cleaner without exposing the motor or electronics to moisture. A rushed cleaning can push oily grounds deeper into the burr set, dull or misalign removable parts, or leave detergent residue behind. The method below works for most home burr grinders, including many built-in machines, with adjustments for the manufacturer’s instructions.
As an Amazon Associate we earn from qualifying purchases at no extra cost to you. Product prices and availability are accurate as of the date shown and are subject to change.

Quick answer: Our top pick in 2026 is the Soft, dry brush, about 1 to 2 inches wide — our #1 rated choice. See the full ranked comparison, alternatives and buying advice below.
What You Need
| Item | Why | Optional? |
|---|---|---|
| Soft, dry brush, about 1 to 2 inches wide | Loosens grounds and oily particles from burrs, threads, and the exit chute without scratching surfaces. | No |
| Handheld vacuum with a narrow nozzle | Removes loose debris without blowing grounds farther into the grinder. | Yes |
| Microfiber cloths | Wipes the hopper, lid, dosing cup, and exterior without leaving much lint. | No |
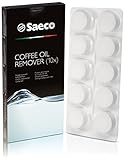
| Grinder cleaning tablets | Absorb coffee oils and fine residue in places a brush cannot reach. Examples include PHILIPS/SAECO Coffee Oil Remover CA6704/99, about $7.62 for 10 tablets, and Urnex Grindz Professional Coffee Grinder Cleaning Tablets, 430 grams, about $18.99. | Yes, but recommended for regular deep cleaning |
| Small bowl and warm water | For cleaning removable, non-electrical parts such as a hopper or catch cup. | No |
| Dry towel and food-safe brush | Helps ensure every washed component is completely dry before reassembly. | No |
Do not substitute rice for grinder tablets. Rice can be harder than some grinder manufacturers recommend, and its starch may swell or leave powder in the burr chamber. Avoid degreasers, dish soap inside the grinding mechanism, compressed air, and abrasive pads unless your owner’s manual specifically approves them.
Step-by-Step
See also: How to Season a New Coffee Grinder (2026): Step-by-Step • How to Clean a Moka Pot Safely (2026): Step-by-Step
1. Unplug and empty the grinder (5 minutes)
Unplug the grinder before removing the hopper, burr carrier, or catch cup. Empty the hopper completely, then run the grinder for about 2 to 3 seconds if the manufacturer permits this procedure. This clears some beans from the burrs, but do not run a grinder empty for an extended period.
Remove the catch cup and discard old grounds. If your grinder has a built-in dosing mechanism or a separate powder chute, consult the manual before opening it. Take a quick photo of removable parts so you know how they fit back together.
2. Remove accessible parts and brush out dry grounds (5 to 10 minutes)
Take off the hopper, hopper lid, catch cup, and removable upper burr if the design allows it. Use the grinder’s locking marks or arrows to guide removal; never force a burr carrier that does not release easily.
With the grinder still unplugged, brush the exposed burrs and chamber. Work from the top downward, using short strokes to lift grounds rather than packing them farther into the exit chute. A narrow vacuum nozzle can collect loosened debris. Keep the nozzle from touching delicate burr teeth or applying force to the alignment surfaces.
3. Clean the hopper and catch cup separately (10 minutes, plus drying time)
Wash only parts that are labeled washable. Use warm water and a small amount of mild dish soap for plastic or glass components, then rinse thoroughly. Do not immerse the grinder body, motor housing, control panel, or electrical base.
Wipe non-washable parts with a barely damp microfiber cloth, followed by a dry cloth. Leave washed components on a towel until completely dry—usually at least 30 minutes, and longer for narrow seams or threaded areas. Even a small amount of water in the grinding chamber can cause clumping or corrosion.
4. Brush the burr chamber and exit chute (5 minutes)
Inspect the burrs for dark, sticky buildup. A light brown film is common; thick, glossy residue or compacted grounds need a deeper cleaning. Brush around the stationary and rotating burrs, the chamber walls, and the chute opening.
If the chute is blocked, use a wooden toothpick or the tool supplied with the grinder to loosen the plug. Do not use a metal knife or screwdriver near burrs, wiring, or plastic chutes. Keep fingers away from sharp cutting surfaces.
5. Run grinder-cleaning tablets (2 to 5 minutes)
Reassemble the dry grinder and add the quantity of cleaning tablets specified on the product label and grinder manual. A tablet product such as Urnex Grindz is designed to pass through the burrs and absorb oils; the 430-gram container is intended for repeated use, not one oversized dose. For an automatic espresso machine, use a coffee-oil remover only in the component and cleaning cycle the manufacturer identifies.
Run the grinder at a medium setting for the recommended time. If no setting is specified, use a small, normal dose rather than filling the hopper. Stop immediately if the motor strains, the tablets jam, or an unusual odor appears. Never grind tablets while beans remain in the hopper.
6. Purge the cleaner with coffee beans (3 to 5 minutes)
After the tablet cycle, brush or vacuum away visible crumbs. Grind about 20 to 30 grams of inexpensive beans, depending on the grinder’s capacity, and discard them. This clears remaining tablet dust from the burrs and chute.
For a heavily soiled grinder, repeat the tablet cycle only if the label and owner’s manual allow it. Do not compensate for neglected maintenance by running repeated cycles back to back; disassembly and inspection may be safer.
7. Reassemble, calibrate, and check the grind (5 minutes)
Replace the burr carrier, hopper, lid, and catch cup. Confirm that locking tabs are fully engaged and that the hopper sits level. Start at the previous grind setting, then grind a small test dose.
Check for a normal motor sound, steady grounds, and a clear chute. If coffee comes out unusually slowly, smells like cleaner, or contains visible tablet fragments, run another small purge dose and inspect the chute again. Avoid changing the burr calibration during routine cleaning unless the manufacturer instructs you to do so.
Mistakes to Avoid
- Wetting the grinder body: Water can reach switches, wiring, and the motor. Use a damp cloth only on appropriate exterior surfaces, then dry immediately.
- Using too much cleaner: More tablets do not necessarily remove more oil and may overload a small grinder.
- Forgetting the chute: Oil often accumulates where grounds leave the burr chamber. A clean burr set cannot solve a blocked exit path.
- Using rice or raw grains: They may damage burrs, produce excess dust, or void a warranty.
- Scraping burrs with metal: Scratches and bent edges can affect grind consistency.
- Reassembling damp parts: Moisture promotes clumping, stale odors, and corrosion.
- Cleaning only when flavor changes: A grinder can hold old oils long before the taste becomes obviously bad.
How Often
Brush the burr chamber and wipe the hopper about once a week if you grind coffee daily. Clean the exit chute whenever grounds begin sticking or the grinder starts retaining noticeably more coffee.
Use grinder-cleaning tablets approximately every 1 to 3 months for a typical home grinder. Monthly cleaning is reasonable for daily use, dark roasts, oily flavored coffee, or doses totaling about 1 pound per week. Light-roast users who grind only a few times weekly may need tablets every 3 to 6 months. Always prioritize the appliance manual and the tablet label.
When to Call a Pro or Replace
Stop using the grinder if it smells electrically burnt, trips a circuit, makes grinding or squealing noises, overheats, or stops while the burrs are clear. A technician can inspect the motor, bearings, switches, wiring, and burr alignment without risking further damage.
Professional service is also worthwhile when oil has migrated behind sealed controls, a removable burr will not release, or the grinder remains inconsistent after cleaning and calibration. Replacement may make more sense when repair costs approach half the price of a comparable new grinder, replacement burrs are unavailable, or the burrs are visibly chipped, heavily rounded, or corroded. Do not operate a grinder with damaged burrs.
FAQ
Can I use vinegar to remove coffee oils from a grinder?
No. Vinegar is a liquid and can reach electrical components, while its odor may linger in plastic and grinding surfaces. Use a dry brush, manufacturer-approved cleaning method, and grinder tablets designed for coffee equipment instead.
Should I wash the burrs with dish soap?
Usually not. Many burrs should be cleaned dry, and soap residue can affect flavor. Wash only parts the manufacturer identifies as washable. If a burr is removable and the manual permits washing, rinse it thoroughly and dry it completely before reinstalling it.
Do grinder-cleaning tablets remove all coffee oil?
They help absorb loose oil and fine residue throughout the burr path, but they cannot replace brushing, chute cleaning, or occasional approved disassembly. Thick, hardened buildup may require manual cleaning or professional service.
Why does my grinder still smell after cleaning?
Odor may remain in the hopper lid gasket, catch cup, chute, or old grounds trapped behind the burr carrier. Clean each accessible part, purge with 20 to 30 grams of inexpensive beans, and let washable components air-dry fully. If the smell is electrical or burnt rather than coffee-like, unplug the grinder and arrange service.
Ready to decide? Our #1 pick for 2026 is the Soft, dry brush, about 1 to 2 inches wide.
Live price & availability on Amazon.