Last updated: September 18, 2026
A moka pot is simple to clean, but a rushed scrub can create bigger problems than coffee residue. Abrasive pads may scratch aluminum, strong cleaners can leave an odor or taste, and a clogged safety valve can prevent pressure from releasing properly. Water trapped inside the pot may also encourage corrosion, mildew, or stale flavors. The safest approach is to let the brewer cool completely, take it apart, rinse each piece with care, and dry everything before reassembly. These instructions work for most aluminum and stainless-steel stovetop moka pots and are suitable as a regular 2026 cleaning routine.
Quick answer: Our top pick in 2026 is the Warm water — our #1 rated choice. See the full ranked comparison, alternatives and buying advice below.
What You Need
| Item | Why | Optional? |
|---|---|---|
| Warm water | Removes loose coffee grounds and oils without damaging the finish. | No |
| Soft dishcloth or nonabrasive sponge | Cleans the exterior and filter without scratching aluminum or stainless steel. | No |
| Small, soft nylon brush | Helps clear the filter holes and the safety-valve area. | Optional |
| Mild, unscented dish soap | Useful for occasional degreasing, especially on stainless-steel parts. | Optional |
| Clean towel or drying rack | Prevents moisture from sitting inside the chambers and threads. | No |
| White vinegar and water | A diluted descaling solution for stubborn mineral deposits, when compatible with the manufacturer’s instructions. | Optional |
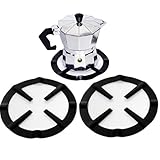
| Iron gas-stove reducer ring, approximately 4 to 6 inches across | Keeps a small moka pot stable on a wide gas grate. A two-pack may cost about $9.99. | Optional |
| Detachable induction adapter plate, approximately 5.5 inches | Lets a non-induction moka pot sit on an induction cooktop. Typical price is about $18.99. | Optional |
Before using any cleaner, check the care instructions for your specific pot. Aluminum moka pots can darken naturally over time, and that discoloration is usually cosmetic. Do not use bleach, oven cleaner, drain cleaner, steel wool, or powdered scouring products.
As an Amazon Associate we earn from qualifying purchases at no extra cost to you. Product prices and availability are accurate as of the date shown and are subject to change.

Step-by-Step
See also: How to Season a New Coffee Grinder (2026): Step-by-Step • How to Fix Weak Espresso Pressure (2026): Step-by-Step
-
Turn off the heat and let the pot cool (20 to 30 minutes)
Remove the moka pot from the burner as soon as brewing is finished, then place it on a heat-safe surface. Do not run cold water over a hot pot. A sudden temperature change can stress the metal, loosen a gasket, or make the handle crack. If you used a gas reducer ring or an induction adapter plate, allow that accessory to cool as well before handling it.
-
Disassemble the three main sections (2 minutes)
Unscrew the upper collector from the lower water chamber. Remove the funnel-shaped coffee basket. In the upper section, gently lift out the flat filter plate and rubber or silicone gasket if they are designed to be removable. Do not pry with a knife or screwdriver; a blunt wooden spoon handle or your fingers is safer.
Keep the parts together so the filter plate and gasket return to their original positions. If the gasket is brittle, flattened, cracked, or permanently stained with oily residue, plan to replace it rather than forcing it back into place.
-
Empty grounds and rinse immediately (2 to 3 minutes)
Tap the coffee basket over a compost bin or trash can. Avoid knocking it sharply against a sink, countertop, or metal waste bin because the basket can dent. Rinse the basket and both pot sections with warm water. If grounds are stuck in the basket, use your fingers or a soft nylon brush instead of a sharp object.
Never pour loose grounds down a kitchen drain. They can collect with grease and contribute to blockages.
-
Clean the filter and safety valve (3 to 5 minutes)
Hold the upper filter plate under running water and inspect the small holes. Clear visible coffee particles with a soft brush. Do not enlarge the holes with a needle, pin, or toothpick; changing the openings can affect water flow and extraction.
Check the safety valve on the lower chamber. It should be free of grounds and mineral buildup. Rinse around it and gently brush the surrounding area. Do not dismantle the valve. If its small pin is stuck, the valve leaks, or it shows severe corrosion, stop using the pot until the valve is replaced or the brewer is replaced.
-
Wash oily residue when needed (3 to 5 minutes)
For routine cleaning, warm water is often enough, particularly for an aluminum pot. If the pot smells rancid or feels greasy, wash removable parts with a small amount of mild, unscented dish soap and a soft sponge. Rinse thoroughly so no detergent remains.
Many manufacturers advise against regular soap on uncoated aluminum because it can affect the surface and leave a flavor. Follow your manual if it specifically says to use water only. Stainless-steel moka pots generally tolerate mild soap better, but abrasive cleaners are still unnecessary.
-
Descale mineral deposits cautiously (10 minutes, plus soaking time)
White or chalky buildup usually indicates hard-water minerals. First try warm water and a soft cloth. If deposits remain, use a diluted solution of one part white vinegar to three parts water only if your manufacturer permits vinegar. Apply it to the affected area for about 10 minutes, then rinse several times with clean water.
Do not leave aluminum submerged in vinegar for hours. Acid can dull or discolor the metal. Never combine vinegar with bleach or any other cleaner.
-
Dry every part completely (5 to 10 minutes)
Shake water from the basket and upper chamber, then towel-dry the threads, filter plate, gasket groove, and valve area. Leave the sections separated and open-air dry for at least 30 minutes before storage. Storing the pot assembled while damp traps water and odors inside.
-
Inspect and reassemble (2 minutes)
Check that the gasket lies flat, the filter is seated evenly, and the threads turn smoothly without grit. Reassemble the pot loosely rather than tightening it as far as possible. Store it with the lid open or the sections separated if your cabinet is humid.
Mistakes to Avoid
- Putting the pot in the dishwasher: Dishwasher detergent and high heat can discolor aluminum, damage finishes, and shorten gasket life. Unless the manufacturer explicitly permits it, hand-wash the pot.
- Using steel wool or abrasive pads: Scratches collect residue and can make threaded parts harder to seal.
- Blocking the safety valve: Do not cover, tape, plug, or aggressively scrub the valve. It is a pressure-safety component.
- Cleaning while the pot is pressurized or hot: Wait until brewing has stopped and the metal is comfortable to touch.
- Leaving the pot assembled and wet: Separate the chambers while drying to reduce stale odors and corrosion.
- Using the wrong heat setup: A small pot can wobble on a large gas grate. A reducer ring in the roughly 4- to 6-inch size range can improve stability. On induction, use only a compatible adapter plate, often around 5.5 inches, and follow the cooktop’s wattage and diameter requirements. An adapter does not make aluminum itself induction-compatible.
- Overfilling or tamping coffee: Cleaning cannot correct unsafe brewing. Fill the water to just below the safety valve, use the correct grind, and do not compress the grounds.
How Often
Rinse the pot after every use and clean the filter, basket, gasket area, and valve as described above. Perform a more thorough soap wash when the pot smells oily, produces bitter-tasting coffee, or develops a visible film. In a hard-water home, inspect for scale every few weeks and descale only as needed. Replace the gasket and filter according to the manufacturer’s guidance or sooner if coffee leaks around the threads.
When to Call a Pro or Replace
A moka pot is usually inexpensive to repair with a replacement gasket, filter plate, or safety valve. Stop using it if the lower chamber is dented near the valve or threads, the safety valve leaks or will not move as intended, the handle is loose or melted, or the upper and lower sections no longer seal evenly. Replace the pot if it has deep corrosion, a crack, severe thread damage, or a warped base that will not sit flat.
Professional repair is rarely economical for a basic moka pot, but a specialty coffee-equipment technician may be worthwhile for a high-end stainless-steel model or a brewer with a manufacturer-supported valve system. Never attempt to weld, drill, glue, or permanently block a pressure component.
FAQ
Can I use dish soap to clean a moka pot?
Use a small amount of mild, unscented soap occasionally for greasy residue, especially on stainless steel. For uncoated aluminum, many manufacturers recommend warm water only. Follow the care instructions supplied with your pot and rinse thoroughly.
Why is my moka pot turning dark?
Aluminum can naturally darken from heat, minerals, and contact with coffee. Darkening alone is not usually dangerous. Avoid trying to restore a shiny finish with abrasive products; inspect instead for pitting, flaking, cracks, or a damaged gasket.
How do I clean a clogged moka-pot filter?
Rinse it under warm water and use a soft nylon brush. If holes remain blocked, soak the removable filter briefly in warm water, then rinse again. Never use a needle to enlarge the openings or force debris deeper into the plate.
Can I clean a moka pot with baking soda?
A small amount of baking soda may help lift odor from some stainless-steel parts, but it can be mildly abrasive and is not necessary for routine cleaning. Avoid aggressive scrubbing, and do not mix baking soda with other cleaners.
Ready to decide? Our #1 pick for 2026 is the Warm water.
Live price & availability on Amazon.