For true coffee enthusiasts, there are few things worse than an under-extracted espresso. A sour, watery shot that lacks depth can ruin your entire coffee experience. If this sounds all too familiar, don’t worry—you’re not alone. With a bit of experimentation and some key adjustments, you can easily fix this issue. Drawing from my personal hands-on experience, here’s a comprehensive guide to perfecting your espresso shots. Explore the features and performance of this machine in our Philips 5500 LatteGo review
Understanding the Issue of Under-Extraction
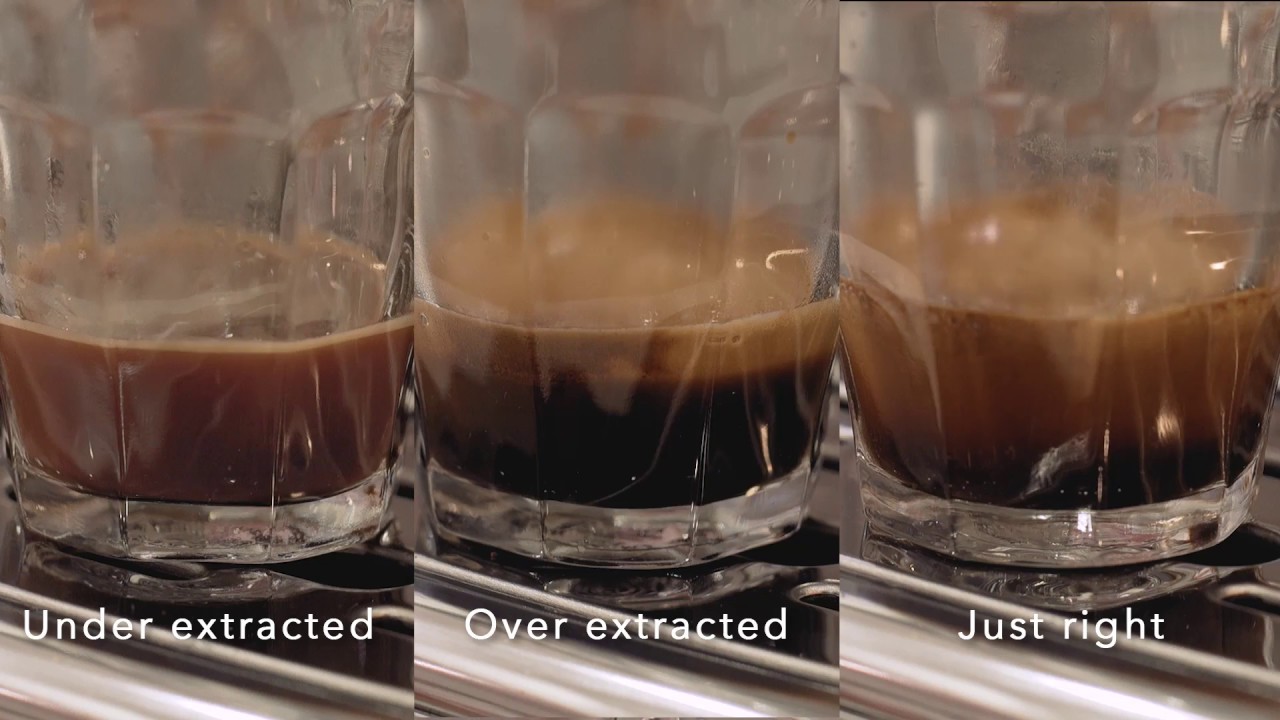
Before diving into how to fix under-extraction, it’s important to understand what it actually is and why it happens. Under-extraction occurs when water flows through the coffee grounds too quickly, failing to extract enough flavor. The result is an espresso that tastes sour and lacks complexity. Dive into the details of the Philips 5400 LatteGo review
Common Signs of Under-Extraction:
Sharp Sourness: Instead of bright acidity, you get an overpowering, sharp sour taste that’s far from pleasant.
Thin Body: A well-made espresso should have a velvety, rich texture. If your espresso feels watery, under-extraction is often to blame.
Weak Crema: Instead of a rich, golden crema, you’ll notice a pale, thin layer on top of your espresso.

Fine-Tuning Your Grind Size
One of the biggest factors impacting espresso extraction is the grind size. Espresso requires a very fine grind. If your grounds are too coarse, the water flows too quickly, leading to under-extraction. Compare these two models in our Philips LatteGo 5400 vs 4300 review
When I first started making espresso, I underestimated how even a small change in grind size could affect the shot. To tackle sour or weak espresso, try grinding your coffee finer. A finer grind increases surface area, helping the water extract more flavors. Discover the differences between these machines in our Philips 3200 vs 4300 vs 5400 review
Pro Tip: Make small, gradual adjustments to the grind size, testing each shot until you find the perfect setting. Be careful—going too fine can lead to over-extraction, which results in bitterness. Learn how these two models compare in our Philips 3200 vs 4300 review
Perfecting the Coffee-to-Water Ratio
The brew ratio, or the balance between the amount of coffee and water, is also crucial. The standard espresso ratio is usually 1:2—18 grams of coffee to yield 36 grams of espresso. If your espresso seems under-extracted, tweaking this ratio can make a big difference. Uncover the key distinctions in our Philips 3200 vs 5400 review
Increase the Dose: Add a bit more coffee to give the water more flavor to extract.
Adjust the Yield: You can also reduce the output for a more concentrated shot.
Using a scale to weigh both your coffee and the resulting espresso helps maintain consistency. I noticed a big improvement in my shots when I started paying closer attention to these measurements.
Getting the Right Water Temperature
Water temperature is another critical factor in espresso extraction. If the water is too cool, it won’t properly extract flavors, resulting in a sour and weak espresso. The ideal water temperature should range between 195°F and 205°F (90°C to 96°C).
If your espresso machine allows you to adjust the temperature, try raising it a bit and see if that improves the flavor. For machines without temperature controls, make sure it’s fully warmed up before brewing—this simple step solved many of my initial espresso problems.
Mastering the Art of Tamping
Tamping, or compressing the coffee grounds in the portafilter, significantly affects water flow. Light tamping causes water to flow too quickly, which leads to under-extraction. Conversely, too much force can over-compress the grounds, resulting in over-extraction.
Aim for a tamping pressure of around 30 pounds. Practicing on a bathroom scale can help you get a feel for this amount of force. A consistent, even tamp is key for ensuring uniform water flow, which directly affects the balance of the shot.
Adjusting Shot Time for Better Extraction
Shot time refers to how long the water passes through the coffee grounds, and it’s another variable that impacts espresso quality. Ideally, your shot should take between 25 and 30 seconds. If it’s pulling too quickly (under 20 seconds), under-extraction is likely.
To increase shot time and improve extraction, you can:
Use a finer grind
Increase the coffee dose
Tamp with slightly more pressure
Once I began focusing on the shot timing, I noticed substantial improvements in my espresso quality.
Using Fresh Coffee Beans
Freshness is often overlooked, but it’s an essential component of good espresso. Coffee beans lose their complexity as they age, especially after roasting. Stale beans produce underwhelming, under-extracted espresso, regardless of your technique.
For best results, use beans roasted within the last two weeks. Fresh beans are packed with oils and soluble compounds, which significantly enhance the flavor extraction process.
Conclusion: Achieving the Perfect Espresso
Fixing under-extracted espresso is all about making small, deliberate adjustments to key variables like grind size, brew ratio, water temperature, tamping pressure, and shot time. While it might feel daunting at first, practice and attention to detail will help you master the process.
Throughout my coffee journey, I found that subtle changes often made the biggest differences. By focusing on these techniques, you’ll soon be able to pull rich, balanced espresso shots that can easily rival those from your favorite coffee shop. Happy brewing!